Monday, December 19, 2011

New Concept Results

Here are the first shots from my new, yet to be named creature/worm. Turned out well I think, cavities filled well and I am pleased with the overall look.


Thursday, December 15, 2011

concept4

Finished up new concept today, tried to develop a streamlined, heavy duty worm that would penetrate the toolies and the weeds, but still have some nice action on the fall, when flipping for bass in the delta. Or maybe in the winter months when the temps. fall and a very slow presentation is needed.


The worm will look slightly different when molded,  the contours on the body and tail section cannot been seen in the model, because they will be created during the machining process. I hope to have this mold completed by Sunday, and some actual worms in bags by Monday.

I think I am going to have a little contest here, cause I need some help naming this worm. If you have an idea for the name of the worm, submit it here, @bassmagnetbaits on twitter or Facebook. I will choose the one I like the best and if it is yours, a sample pack of every worm I make will be sent to you. Thanks and good luck.

Tuesday, December 6, 2011

Retail site

Finished building a retail website today, Have a look, let me know what you think, purchase something if your so inclined. Do not worry about hurting my feelings, this is all new to me (website design) and I am open to all comments and advice. Thank you all.

http://www.bassmagnetbaits.com/

Monday, November 28, 2011

Ambush Craw

Just a short post this time to show the new "Ambush Craw" mold that I recently finished and poured today. This is a original design by me, with a little influence from some cool looking worms currently on the market. It is a approximately 6" in length. This sample was done is a slightly darker than normal watermelon with small and large black flake.


Tuesday, November 15, 2011

Current project

Currently working a new mold, this will be a flipping craw bug, approximately 5 1/2" inches long. solid body worm. We use this type of worm in the delta for fishing the weeds and toolies. This will be my 3rd working mold and I think I have a good runner and gate design that works well for this particular type of plastic.


My "Delta Hog" has seen a little success, I had customer purchase 1 worm for a trial run, and turned around
and purchased 18 more then next week. gonna be adding a counter on this page to keep track of total sales, lol, hopefully I an retire soon.

I also worked on perfecting some color recipes this week:

Red watermelon:
4oz plastic
16 drops watermelon
4 drops black melon
1/4 tsp small red flake
1/4 tsp medium black flake
1/2 tsp salt


Green Pumpkin:
4oz plastic
16 drops watermelon
32 drops pumpkin
1/4 tsp large red flake

Wednesday, November 9, 2011

I love the Delta

After getting skunked the week before soaking bait in the Suisun sloughs trying to catch a big striper, my father and I tried to redeem ourselves Tuesday morning in the delta.

The day started very slow, the tide was very low and still going out me we got on the water at 730am. We hit a couple of the usual spots with no success, we even tried a couple random spots, also with no luck, but I was convinced the low/slack tide was to blame for the slow fishing. We decided to return to a very familiar spot for me, a spot we call "the rock wall". It is a very long stretch of riprap bank of the deep water channel.

Soon as we got to this spot, the tide changed and was on its way in. Also the water clarity was totally different in a good way. Second cast with a 3/4 ounce "RAT-L-TRAP" produced a nice little black bass, and our spirits we instantly raised when a second black bass smashed a spinner bait in about 5 foot of water just 2 casts later. This rock wall was definitely the ticket today. We ended up catching 4 decent black bass, 1 keeper striper, and get this a very nice salmon. What an awesome day it ended up being.

I also got a little work in today and poured a bunch of delta hogs and sinkos in a new color, motor oil with red flake. I messed with the recipe a little by adding some green color to darker it a little. Below are the results.

I hope to have a new craw mold finished this week and some new worms on the market soon.


Friday, November 4, 2011

Very busy

Haven't had a lot of time to post anything the last couple of weeks, but better late than never. I made a small modification to the plunger in my hand injector and was very eager to try it out. I made a taper on the plunger to match the taper in the backside of the nozzle so that the plunger would shut off on the nozzle so that there would not be a space there for the plastic to cool and cause me to have to clear this obstruction after each shot.

I also was able to complete my design for a 3 cavity 2 piece injection mold for my "SENKO" worm. A 6" worm that we hook weedless when fishing in the delta, that the big bass love,

I decided to try a recipe called
"La craw".

8oz liquid plastic
30 drops
3 drops red
Blue, red, and copper flake to taste

I really liked they way this color turned out, and I was very happy with the outcome overall. I started with a little more plastic this time, because I wanted to practice my technique more and also wanted to produce a few more worms since I knew I was going to get a chance to fish this week. I wanted to get some on eBay also.

Went fishing with one of my oldest friends, Brian, it was good to see him out on the water both of us enjoying one of our most favorite hobbies. He has been going through some tough times lately, but he is always positive and keeps moving forward. Things can only get better for you Brian, keep our head up bud. ❤

The weather did not cooperate with us, 30-40 mph winds made it very difficult to fish. However we did catch 3 fish on spinnerbaits and 1 on a worm, overall it was a very brutal day of fishing.

Below are the pictures of the new mold , the new worm, the "Delta hog" in this new color, and in the water in the delta.


Wednesday, October 26, 2011

Improving...

Put in a little practice today with the delta hog mold. I purchased some additional colorant and flakes as well so I wanted to work on some recipes for popular colors that have worked well for me in the past.

Recipe: watermelon
4oz. Plastisol
16 drops watermellon
1 drop black
Green flake

I was quite happy with the results of this recipe, and actually the first shit filled completely and molded nice. I noticed the color was a little on the light side for my likening, so I added 5 more drops of watermelon and 5 more drops of black. This really darkened the worm closer to what I wanted to see.

I was able to mold 7 worms and 2 grubs with only 4 ounces of plastisol.

I do need make some improvements to the hand injector nozzle and the sprue on the mold. I have a taper on the inside of the nozzle and the plunger of the injector is flat. This is not going to work in a production scenario. After each shot, the are in between the plunger and the taper would hold the plastic and it would cool clogging the injector. The plunger and the taper are going to have to shut off to keep this from happening. The front of the nozzle needs to be changed as well, I want to create a taper instead of the straight diameter and redesign the sprue on the mold to match this taper. This should improve the overall molding process.


Tuesday, October 18, 2011

New relationship

Have not had a lot of time this week to work on any new designs or molds, but I do have a little news to report. I was contacted by someone who was interested in my work here, and would like to work together to produce some two piece injection molds for some baits that he has designed. I am pretty excited about this new venture, and cant wait to get started. He has some great design and will be doing the mold design, while I will do the programming and machining of the mold to his specifications.

I also have been researching bench top CNC mills on the internet. This has always been something that I have wanted to get, but have never really had a "product" to manufacture. hopefully this will turn into something that will allow me to purchase something like this, http://www.smithy.com/index_inside.php?id=996 , soon. Having a
CNC mill at home would be awesome, and would more than likely make my wife happy, even though she does not think so, because it would get me out of her hair, lol.

I also emailed fishermans warehouse in Sacramento, Ca., asking about what I need to do to get some molds and or worms into their store. I have not had a response as of yet, but will be patient.

So, hopefully soon I will posting pictures and comments from the project mentioned above.

Tuesday, October 11, 2011

Banned from tackleunderground.com

lol, I got banned from a lure making and bass fishing forum today. I guess the administrators if the site did not like my posts of my molds and worms. I was getting some good feedback and comments from some of it's members, but I guess if you make any type of comment about how strict they about what you can and cannot post they insta ban you.

I had posted a couple of pics of my latest 2 piece injection mold and the finished product, and the moderator told me that they had specific galleries for such posts and deleted my post. Then I posted a comment telling the moderator how I thought it was unfair and they shouldn't be so strict.....insta ban. No warning, no 2 day ban, insta permanent life time ban, wow.

www.tackleunderground.com moderators, you suck.

That is all.

Monday, October 10, 2011

Success

Finally after many design changes, additions, hypothesis's and theories, I have finally successfully molded my Zoom Brush Hog replica I call the "Delta Hog". I was so happy to see the worm fully formed as I opened that mold for the first time. This is truly my first attempt using the injection molding process, as well as my personally designed and built hand injector and two piece aluminum mold.

If you have been following or read my very last post, I redesigned my hand injector to this current version (pics below). It is a basically the same design, just a little bit smaller, and with a different tip, thanks to some advice from a couple of members from the http://www.tackleunderground.com/ forums. I still believe there can be some tweaking in this area as my design worked but was not that easy. I probably need to design a tip and sprue to be universal and I will probably increase the runner a small amount, as well as make the hole in the nozzle of the injector to match the runner.

Overall, I am happy with the outcome, I cant wait to try them out in the delta ASAP. I will be sending some out to friends and family in different parts of the country to see how they work for them, as soon as I get some more colorants and inject some more. I am currently shopping around for colorants and glitter and possibly some scents, so, if you have a trusted source, that has the best prices, please let me know here.

Now, to the good stuff, the pictures.


The new hand injector.


The new Delta Hog 2 piece injection mold in 6061 aluminum.


The result


Up close


The recipe I started with:

150 ml MF plastisol
10 drop root beer colorant
5 drops green colorant
red flake
gold flake

For the hog in the back, I added 6 more drops of green colorant, turned out pretty good I thought.

Thanks again to my friends and family for thoughts and advice given to help me out.

Next up..... The 6" Senko.

Friday, October 7, 2011

Made my first hand injector

Worked thru my lunch and breaks today to design and build my first hand injector. Basically just used what I had in the bottom of my toolbox, and engineered it on the fly, and assembled on my break. Testing to be performed Monday with the new 2 piece "Hog2" injection mold.

Thursday, October 6, 2011

hog2

After the failure of the first attempt using the 2 piece mold for "delta hog", I have received a lot of useful information and advice from a few friendly members of www.tackleunderground.com and my co-worker and friend Dirk H. I have tried to incorporate the information I received and some of injection molding principles that I have learned over the years into a the next mold I will build. 

Included in the changes I have made to the new design, I scaled the overall size of the worm up by 25%, which increased the overall length from approximately 4 inches to just a little over 6 inches, as well as all the other features of the worm. I changed the design of the "legs" on this worm too, I basically changed it from a straight leg to more of a willow leaf shape. I also added vents to all features of the worm that will let air that is trapped in the cavity when the mold is closed, escape during the filling of the mold. Redesigning the "runner" to fill the mold was based on a hand injector that I will be using for the plastic. I am in the market for a proper aluminum hand injector, but they seem a bit expensive for what they are. I am hoping to design and build my own injector in the near future, but for now I think the one I have will work at least for testing. I still would like to build this mold out of clear acrylic, so that I could visually seem whats really going on. 

I am very hopeful this time I will be able to mold the Delta hog successfully and get some out in the water and to some of my friends for testing. Also feel free, to comment, give advice, at anytime, I have still learning here and appreciate any information.


Monday, October 3, 2011

First 2 piece mold

I finally was able to some machining done on my first 2 piece mold design for my "brush hog" replica. I decided to try and use black delrin to machine the cavity into this time, just because I could decrease the machining time by half compared to aluminum. I include a short "runner" at the top of the mold to fill the cavity. Overall I am very happy with the way the cavity and runner turned out.

The recipe:

100ml plastisol
10 drops motoroil
3 drops green
Gold flake
Red flake

Pretty disappointed with the results of the performance of the mold. I just could not get it to fill. I tried to pour slow, I tried to pour fast, neither method was successful a filling the entire cavity. Each attempt only filled the the main body, the "arms", the "legs" and a very small portion of the tail of the hog. I also found that the worm would not release from the mold as easily as it would from the aluminum molds previously used. My fix for the sticky problem, that's right, cooking oil spray. This actually worked well, but did not aid in the filling of the cavity. Next I tried to open the runner diameter from 1/4 inch to 3/8 inch, no change. I tried to drill a 1/4 inch hole on the back of the mold through to the cavity body, and tried to fill the cavity with the mold laying horizontal instead of vertically, no changes.

Now, I am little frustrated at this point, I think mostly because I had very high hopes for this process, and for it to fail so miserably, is very disappointing. I remind myself that this is how R&D works and to not give up, and learn from mistakes, analyze the situation and come up with some improved processes and develop better ideas. I think that I am trying to be too precise with my designs, too much detail. Or maybe the size of the extremities on the worm are just too small to fill properly, I designed the worm with an overall length of about 4 inches, I think I need to go bigger, bigger legs, arms tail, everything. The other thing I think I need to change is the delivery of the plastic to the cavity. I need some sort of injector, I think. Something that will inject plastic quickly, and with some pressure.

I continued to pour the reaming plastic in the 1 piece aluminum molds that I had previously made, so that I could get a good look at the color scheme and the flake distribution in the plastic. This I am very pleased with! The color is awesome, and I do not think the photos give it justice. Out of direct sunlight the worm appears to be a dark, mossy, green color with dark red flakes. But in direct sunlight, the craw is a medium brown and transparent gold, with bright reflective gold and red flake. This is definitely a keeper recipe.


My first 2 piece mold, made from Delrin.


First pours from new 2 piece mold (FAIL).


Monday, September 26, 2011

Messing with colors

Although I have a new worm design, and a new 2 piece mold design in the works, I have not been able to get anything done on it this week. My real job got in the way this weekend, and while priorities are priorities I hope to get some work done on that next week.

As far as the new design goes, I added "runner" or a way to better fill the cavity with plastic. I also have incorporated some venting from the cavity to the outside of the mold to allow air to escape during the filling of the cavity. Some other processes that I plan to test out with be pee heating the mold to allow for better flow of the plastic during pouring, but thus will only benefit if the mold is made from aluminum, so this will have to wait since the next testing will be done with acrylic mold material.

So, I decided to try and do some testing today with the existing molds that I have and tried to figure the best temperature to keep the plastisol at for the best pouring results possible. I used a digital thermometer to monitor the temperature and continued to raise the temp. until the plastic was at it's optimum viscosity. This turns out to be around 325 degrees F. I also decided to start out on the lighter side with the colors. I used only a few drops of brown and a few drops of green along with gold and black flake.

Overall I am pleased with the results for today. The plastisol stay very liquid the whole time I was pouring, the colors turned out more realistic than before. I learned to be a little more patient when pouring, before u was a little rushed because I was concerned that it would cool to quickly, but this was not the case.

I learned a few things today and can't wait to get a new mold completed, and get some Bass Magnet Baits "Delta Hog" worms into the waters of the California Delta.


Wednesday, September 21, 2011

New Design

Working on a new design today, this is a pretty popular worm in the California delta called the "Brush Hog" made by Zoom baits. I personally have never fished it before but I hear a lot of chatter about it from fisherman I talk to at the launch ramp.

This type of bait is "flipped" into to the weeds or tullies during slack tide situations when the fish are not very active. Or fished "Texas rigged", with a small bullet weight or even no weight, depending on the wind conditions, on the rip-rap banks.

This will be my first 2-piece mold, I will try to incorporate some of my knowledge of thermo-plastic injection mold design that I learned while building ceramic and thermo-plastic molds for Wunder-Mold Inc.

Here is an image of the CAD/CAM design that I will use to generate the CNC code to machine the acrylic.


Wish  me luck.....

Tuesday, September 20, 2011

First attempt....

For as long as I can remember I have been a fisherman, and some of my fondest memories growing up in Norther California are of fishing with my Dad. We fished as much as possible when I was a kid, whether it was in my dads boat out on Lake Berryessa, the "rip-rap" banks in Rio Vista, to the "Red Barn" on grizzly island in Suisun City. It was a huge part of my life when I was younger, and still is one of my favorite leisure activities to this day.

My very best friend, Dave Hettick and I, purchased a small aluminum bass boat, re-upholstered the interior, and got the boat "tournament" ready, and proceeded to fish every possible moment that would could back then. We fished Berryessa probably more than anyone ever could during this time, and I enjoyed every moment spent on the boat with Dave, some of the best times of my young life. We joined up with a local fishing club based out of Fairfield, Ca. "The Bass Reapers" that introduced us to true tournament bass fishing. These were a great bunch a guys, that taught me a lot about fishing for bass, tournaments, camping, and of course drinking. To this day I am friends with a few of these old timers.

Lake Berryessa is the largest lake in Napa County. This reservoir is formed by the Monticello Dam, which provided water and hydroelectricity to the North Bay region of the San Francisco Bay area. It is a deep, clear water lake, with steep, rocky banks, perfect for "worming" bass. Carolina rigged 4" inch platic worms was how we fished for bass on this lake. We would take day trips to Manteca, Ca. to shop at Delta bait & tackle, because they had the best selection of plastics anywhere around. This is where we discovered the "Binky Bug".

The "Binky Bug" was a custom made worm that someone local was hand pouring and selling at this store. This turned out to be the worm of choice for us on lake Berryessa. We fished the hell out of this worm, I mean we basically would not fish with anything else. However, at some point the person making these things just stopped. So, we decide we would make out own. After purchasing a molds, plastic, colors, melting pots, glitter, and a litany of other items, we attempted to reproduce this worm. If I remember  correctly, we were pretty good at it.

The only thing I regret about this part of my life was what exactly happened to the relationship that I had with my good friend, Dave. Somehow we grew apart, or I probably did something stupid to drive him away, I really cant remember but, this has always been a mystery to me.

There are many, many other stories and adventures that I will share in this blog, but the intention for this is to keep a record of my attempt to duplicate the "Binky Bug", and possibly produce some custom plastic worms that I can bring to market.

I have produced a couple test molds, purchased some basic supplies to get started creating "recipes". This is my first attempt after a very long hiatus so be kind with your comments.


Recipe #1

4oz. M-F 502 Plastic
5 drops brown
20 drops motor oil
2 drops green
black, silver, red, green, .035 glitter
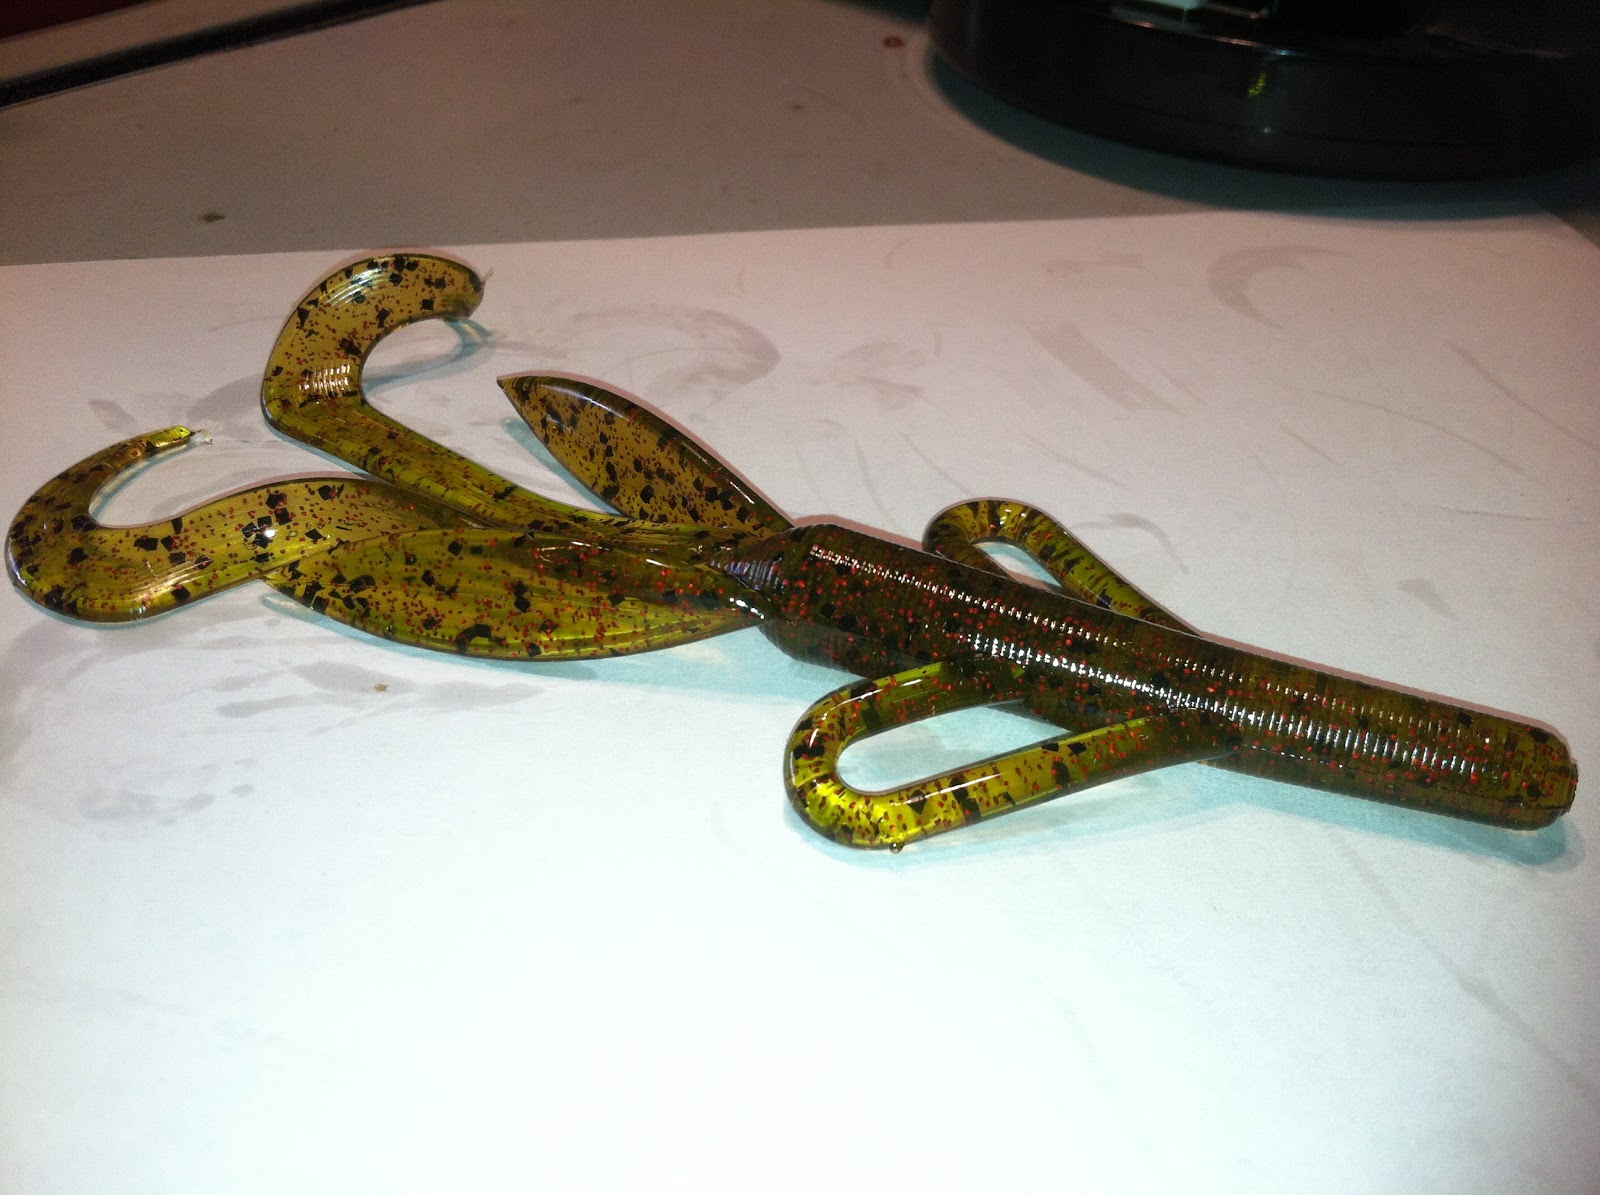
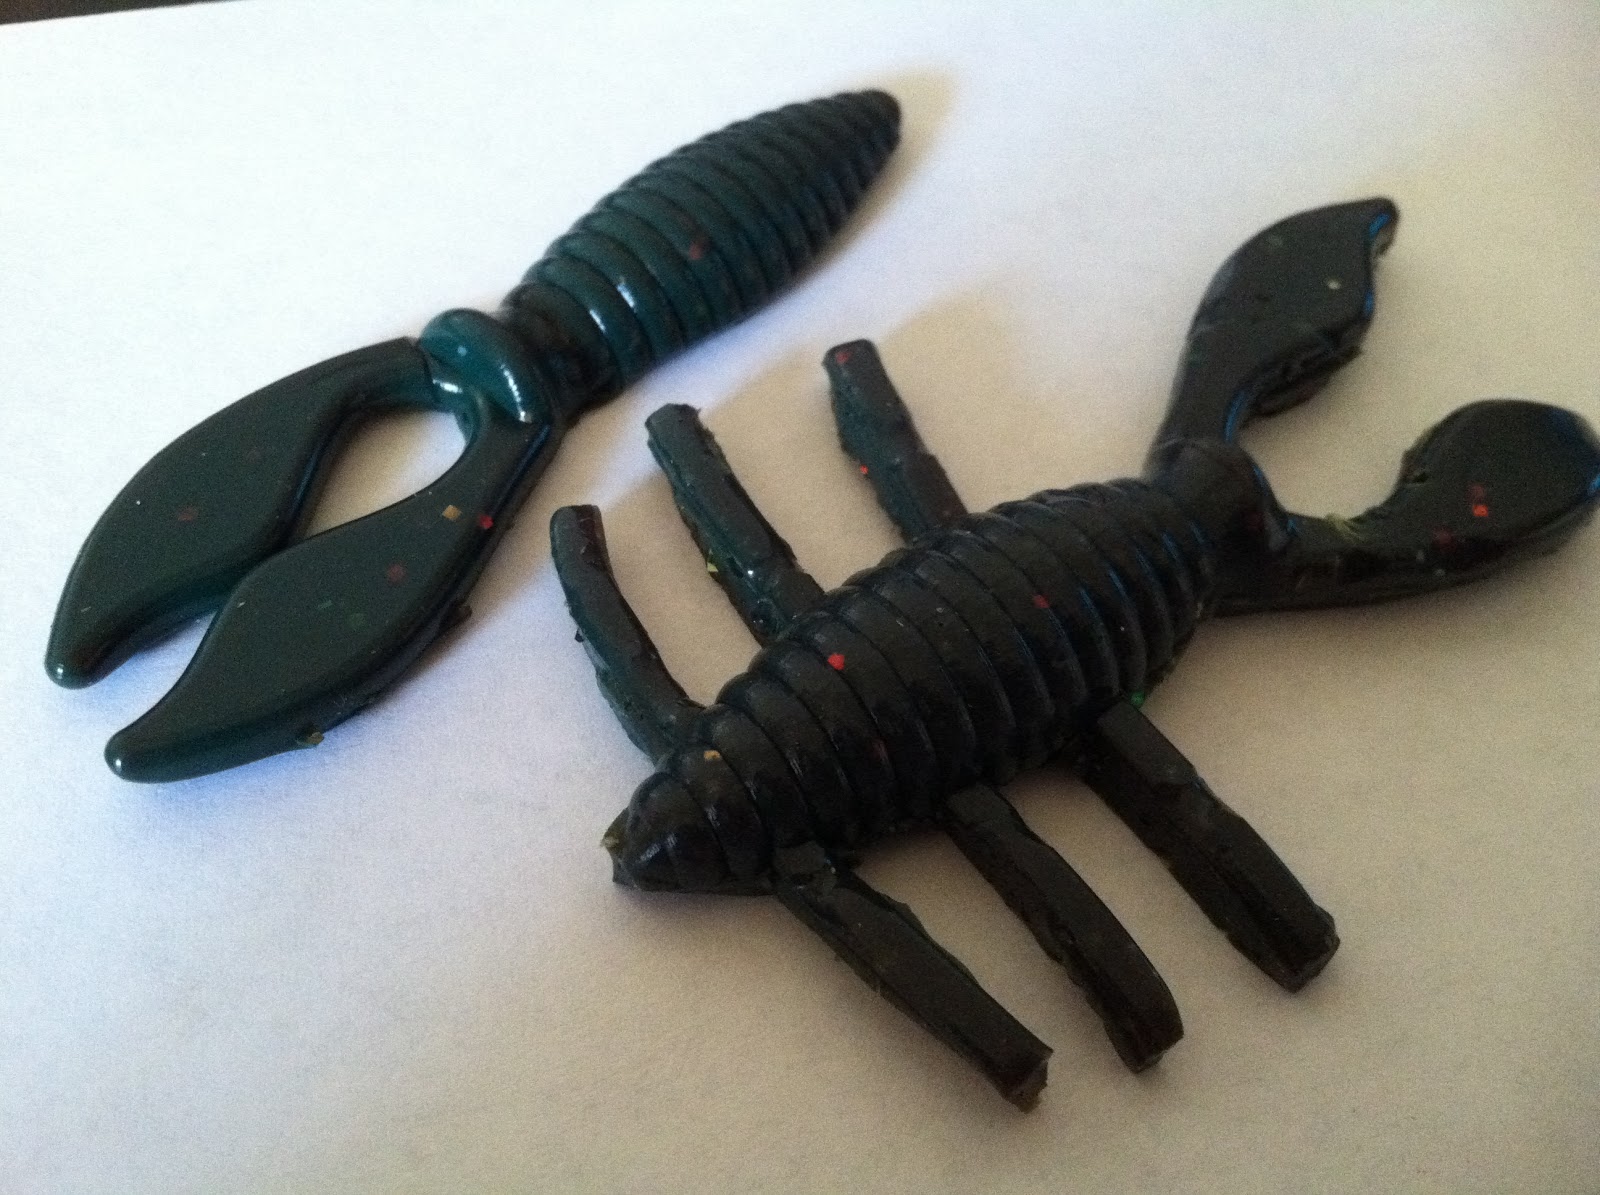


Result:


Overall, I am not pleased with the result. The color is not realistic looking. There is nothing in nature that would ever be this color. The size and shape is good I think, from my recollection this looks about right. The actual pouring of the plastic was harder than I remember, trying to get the plastic to fill the mold without over filling was quite difficult.


Observations:

1. I think I need a thermometer to control the temp of the plastic better, the plastic needs to stay more "pour-able" when it got to hot it started to actually become thicker.
2. I need to rethink the mold, I produced the first molds out of aluminum with an open cavity, I think for my next attempt, I will use a 2 piece acrylic mold with the cavity split between the 2 halves so that I can close the mold and pour the plastic in without having to be so precise on filling the cavity, and making it out of clear acrylic I will be able to see how the cavity fills.
3. The colors are gonna be key, I think I need to start out lighter and go darker, 20 drops of motor oil was way to much.